UI Layouts
Android View and Layout Basics
In Android, the basic building block of a user interface is the View object. A View is created from the View class, occupies a rectangular area on the screen, and is responsible for drawing itself and handling user interactions. All UI widgets such as buttons, text fields, and text labels are derived from the View class.
A ViewGroup is a subclass of View that acts as an invisible container. It can hold other Views or even other ViewGroups and is mainly used to define how child views are arranged on the screen.
At the next level, Android provides various layout classes, which are subclasses of ViewGroup. A layout defines the structure and arrangement of the UI. Layouts can be created dynamically in code using View and ViewGroup objects, or they can be declared using XML files (such as main_layout.xml) placed inside the res/layout directory of the project.
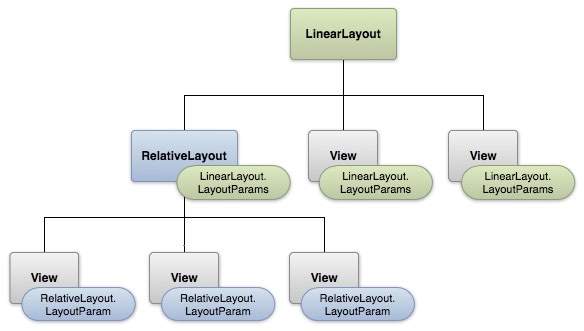
Layout Params
This tutorial mainly focuses on designing the user interface using XML-based layouts. A layout can include multiple UI components such as buttons, text views, input fields, and more.
Below is a simple example of an XML layout using LinearLayout:
Once the layout is created, it can be loaded into an Activity using the setContentView() method inside the onCreate() callback:
public void onCreate(Bundle savedInstanceState) { super.onCreate(savedInstanceState); setContentView(R.layout.activity_main); }
Types of Android Layouts
Android provides several layout types to organize UI components in different ways:
| Sr.No | Layout Name | Description |
|---|---|---|
| 1 | LinearLayout | Arranges child views in a single direction (horizontal or vertical). |
| 2 | RelativeLayout | Positions child views relative to each other or to the parent. |
| 3 | TableLayout | Organizes views into rows and columns. |
| 4 | AbsoluteLayout | Allows positioning views using exact coordinates. |
| 5 | FrameLayout | Acts as a container for displaying a single view. |
| 6 | ListView | Displays a vertically scrollable list of items. |
| 7 | GridView | Displays items in a two-dimensional scrollable grid. |
Common Layout Attributes
Every layout supports a set of attributes that control its appearance and behavior. Some commonly used attributes include:
| Sr.No | Attribute | Description |
|---|---|---|
| 1 | android:id | Uniquely identifies the view. |
| 2 | android:layout_width | Defines the width of the view. |
| 3 | android:layout_height | Defines the height of the view. |
| 4 | android:layout_marginTop | Adds space above the view. |
| 5 | android:layout_marginBottom | Adds space below the view. |
| 6 | android:layout_marginLeft | Adds space to the left of the view. |
| 7 | android:layout_marginRight | Adds space to the right of the view. |
| 8 | android:layout_gravity | Specifies how the view is positioned inside its parent. |
| 9 | android:layout_weight | Distributes extra space among views. |
| 10 | android:layout_x | Sets the x-coordinate (used in absolute layouts). |
| 11 | android:layout_y | Sets the y-coordinate (used in absolute layouts). |
| 12 | android:paddingLeft | Adds padding inside the view on the left side. |
| 13 | android:paddingRight | Adds padding inside the view on the right side. |
| 14 | android:paddingTop | Adds padding inside the view at the top. |
| 15 | android:paddingBottom | Adds padding inside the view at the bottom. |
Width and Height Values
The width and height of a view can be specified using different units such as:
dp – Density-independent pixels
sp – Scale-independent pixels
px – Pixels
pt – Points (1/72 of an inch)
mm – Millimeters
in – Inches
Instead of fixed values, developers usually use these constants:
wrap_content – Sizes the view according to its content
fill_parent – Expands the view to match the parent size
Gravity Attribute
The gravity attribute is used to control the position of a view within its container. It can take one or more values separated by |, such as:
top, bottom, left, right
center, center_horizontal, center_vertical
fill, fill_horizontal, fill_vertical
start, end
clip_horizontal, clip_vertical
Each value determines how the view is aligned or stretched inside its parent layout.
View Identification
Each view can be assigned a unique ID so it can be referenced in Java code. The syntax for defining an ID in XML is:
android:id="@+id/my_button"
@ tells Android to treat the value as a resource reference
+ indicates that a new resource ID should be created
To access this view in code, use:
Button myButton = (Button) findViewById(R.id.my_button);